
Operating System


By Pablo
Machón
Machón
Pablo Machón is a self taught, dedicated technologist.
That's the way you do it
Beginner
Easy
Arch Linux Installation (Manual, Basic)
How to install a basic Arch Linux the manual way
This guide shows the way to install a basic Arch system, able to boot to console with user root and with the minimal set of packages, and with optional desktop environment. This is the learning version. The kernel is not fully free, so this is not the preferred installation for a production system, but a basic learning exercise. Expect the fully free version as a separate article in the near future.
Initial Prerequisites and Assumptions
The installed system will have the following characteristics:
- Installation from scratch, from an USB drive (“pendrive/USB stick”)
- UEFI boot system
- AMD or Intel x86_64 CPU Architecture
- Single system partition
- Connection to the Internet through an ethernet cable
- NetworkManager networking
- Grub bootloader
- Emacs text editor
- Optional Desktop Environment (KDE Plasma)
Work Plan
This Arch Linux install guide will lead to a functioning system with an optional user account added, and a graphical environment. The computer must be connected to the Internet through an ethernet cable. BIOS access must be possible, in order to configure boot from an USB drive.
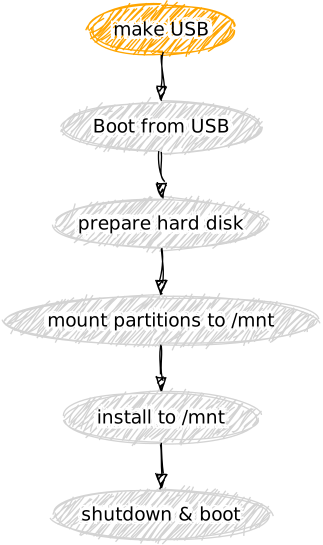
The work sequence is the following:
- Get or prepare the USB drive
- Set up the computer to boot from USB drive
- Boot the computer from the USB drive
- Partition the internal disk drive
- Format the disk partitions just created
- Mount the partitions in /mnt
- Bootstrap OS packages to /mnt
- Chroot to /mnt
- Finish configuring system from the chroot, including the grub bootloader
- Exit the chroot
- Shutdown the computer. Remove the USB drive
- Start the computer and boot normally to the just installed OS
Get or prepare the USB drive with the boot media
An Arch Linux installation media (USB drive or “stick”) is needed. It may be prepared following this guide: (Arch) USB flash Installation Medium.
Quick summary of the creation process:
- Get the Arch Installation Media
ISOFile from any of the mirrors in this page: Arch Linux Download. The file is calledarchlinux-x86_64.iso. At the time of this article’s writing, this was a valid link: archlinux ISO file. If it does not work, look for it in a mirror from the mentioned Arch Linux Download page list. - Write the ISO to the USB drive (with
dd, etc). The procedure is different depending on our operating system. Here you have all the different ways to do it.
I recommend keeping such USB stick available for future uses or installations.
Boot from USB
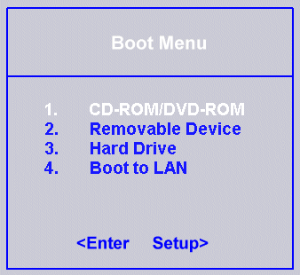
Your computer allows you to choose what media to boot from. Normally you boot from your hard disk. In this case you have to get your computer to boot from the USB stick, in order to install the arch system. When you start the computer with the on/off button, a screen appears briefly with a legend like “F1 Setup - F8 Boot menu“, “Press F12 to choose boot device“, or similar. Press the key that leads you to choose the boot device or enters the boot menu. In the aforementioned examples, the keys would be F8 or F12 respectively1.
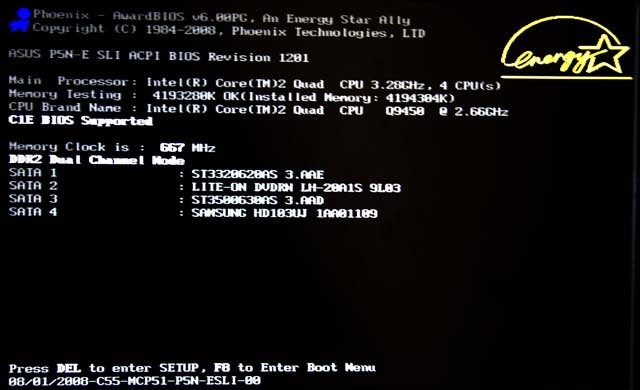
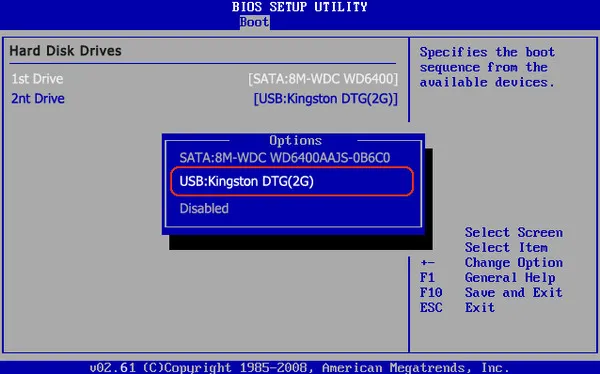
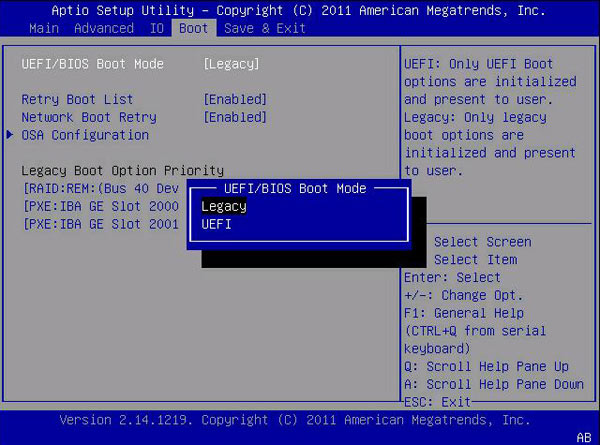
If you can not find the way to boot from an USB you may query a local or public LLM service (“AI”) with the exact details of your motherboard. Look for its full name and prompt:
Explain the exact steps needed to boot a computer with a
<make and model of the motherboard, e.g. ASUS ROG STRIX X870E-E>
motherboard, from an UEFI USB linux boot disk (provided).
Present me with precise, clear steps, including specific keys to
press when needed.
Once you are in the boot menu, choose the USB drive, and the computer will boot from it, meaning that the system will start from it and not from the computer hard disk. After a little while you will be at a shell prompt, logged in as the root user, ready to receive your commands.
Prepare the installation
Set the keyboard layout
If you do not have the US keyboard layout2, adjust now your keyboard, so that you can reach all special characters with ease.
List layouts:
# ls /usr/share/kbd/keymaps/**/*.map.gz
Activate a layout:
# loadkeys es-latin1
Connect to the Internet
Connect your Internet router to the computer with an ethernet cable. That is preferred to wifi connection, for speed and ease of operation. Ensure you have a connection:
# ip link
Your network interface [https://wiki.archlinux.org/title/Network_interface] must be listed and enabled. A way to check if you have Internet connection is to ping to a known site, and see if there are errors or success:
# ping 8.8.8.8 # this is google's DNS server

  64 bytes from 8.8.8.8: icmp_seq=1 ttl=117 time=37.6 ms
  ...
Fix your Internet connection (router, cabling, etc.) until you get a proper answer from that command (no connection errors). When you reconnect your cable, the system will retry connection and it will work if you have a proper Internet access service.
Verify boot mode
Boot mode can be one of two possibilities: UEFI boot mode or BIOS boot mode. While BIOS is simpler, new computers require UEFI. This guide assumes UEFI mode.
To verify the current boot mode, list the efivars directory:
# ls /sys/firmware/efi/efivars
If there is no error and the command succeeds, showing you the directory’s contents, then you have booted in UEFI boot mode. If the directory does not exist, then you have booted in BIOS boot mode. If the system did not boot in UEFI mode, refer to your motherboard’s manual, modify the computer’s BIOS settings, reboot and start again until the previous command shows files instead of an error.
Set the System Clock
The clock must be synchronized automatically as you connect to the Internet. Check it with:
# timedatectl status
Prepare Disk
Determine the disk name and device name
Use fdisk to determine what disks you have in the system, and which one you want to use to install Arch:
# fdisk -l
You may also use lsblk (“list block devices”):
# lsblk
Both tools give a listing of devices, with names, sizes, etc. Check the sizes to determine what is the internal hard disk, as opposed to the USB drive, also in the listings.
For example, if you have an USB drive of 16GB of capacity, and an internal disk of 2 TB, the listing could show:
❯ lsblk
NAME                  MAJ:MIN RM  SIZE RO TYPE  MOUNTPOINTS
sda                     8:0    1 14.4G  0 disk
└─sda1                  8:1    1 14.4G  0 part  /
nvme0n1               259:0    0  1.8T  0 disk
In that example, the name of the USB drive is sda, and the internal disk is nvme0n1. The USB drive has a partition (sda1), and the internal disk has no partition. The device names would be the named with /dev/ in front of them, i.e. /dev/sda and /dev/nvme0n1.
The installation will be done to the internal disk, in this case nvme0n1. The device name of that disk, in this example, would be /dev/nvme0n1. It is very important to notice what device is the correct one. Deduce it from the sizes (14.4Gb versus 1.8 TB in this example).
Once you chose what block device (disk) to use, determine the partitions that you are going to prepare. At the minimum, you need:
- An EFI system partition, needed to boot the system
- A swap partition, to be used as virtual memory
- A root partition, containing the root directory /, with the files of the new system
The partitions are defined in the partition table of the device.
Use fdisk to create or modify the partition table of the installation device:
# fdisk /dev/<device name>
For example, if the device name is nvme0n1, the command would be: fdisk /dev/nvme0n1.
Take special care to install to the installation device, not to the USB drive.
This is the desired partition table, in case the device name is nvme0n1:
| disk | partition | Partition Type | Suggested size | Target mount point |
|---|---|---|---|---|
| nvme0n1 | nvme0n1p1 | EFI system partition | 512 MB or more | /boot/efi |
| nvme0n1 | nvme0n1p2 | linux swap | 8GB | |
| nvme0n1 | nvme0n1p3 | linux | 1.8TB | / |
Command sequence to follow during fdisk session:
| Command | Explanation |
|---|---|
| g | new partition table of type “gpt” |
| n | create new partition |
| <enter> | accept suggested partition number (1) |
| <enter> | accept start sector (minimum available) |
| +512M | Make the first partition 512 MB in size |
| t | Change partition type |
| 1 | Select partition type 1 (“EFI boot”) |
| n | create new partition |
| <enter> | accept suggested partition number (2) |
| <enter> | accept start sector (minimum available) |
| +8G | Make the second partition 8 GB in size |
| t | Change partition type |
| 19 | Select partition type 19 (“Linux Swap”) |
| n | create new partition |
| <enter> | accept suggested partition number (3) |
| <enter> | accept start sector (minimum available) |
| <enter> | Make the partition as big as the rest of the disk. It will be “Linux” type by default |
| p | Print partition table for review. Must be like previous listing. |
| w | Record partition table to disk, and exit fdisk. |
Format partitions
Main linux partition
# mkfs.ext4 /dev/«linux_partition»
In this example, mkfs.ext4 /dev/nvme0n1p3
Linux swap partition (virtual memory)
# mkswap /dev/«linuxswap_partition»
In this example, mkswap /dev/nvme0n1p2
EFI boot special partition
# mkfs.fat -F 32 /dev/efi_system_partition
In this example, mkfs.fat -F 32 /dev/nvme0n1p1
Mount file systems for installation
Now that the disk partitions are ready, the system can be installed on them. In order to do so we need to mount them in a folder (“connect the partitions to a folder so that files can be installed inside them” ). As the process is finished, all files will be installed in the disk partitions.
Mount Root Partition
To mount the partitions in the folder /mnt, start with the root partition :
# mount /dev/<root_partition> /mnt
In the example: mount /dev/nvme0n1p3 /mnt
Mount EFI partition
mount --mkdir /dev/<efi_system_partition> /mnt/boot/efi
In the example: mount --mkdir /dev/nvme0n1p1 /mnt/boot/efi
Now all the target partitions are mounted in their directories under /mnt.
Enable swap partition
swapon /dev/<swap partition>
In the example: swapon /dev/nvme0n1p2
Select the Arch Linux Mirrors
Packages to be installed must be downloaded from mirrors (public servers).They are defined in /etc/pacman.d/mirrorlist. Edit that file and select your preferred mirrors. Default mirrors should suffice.
You can edit that line with the editor nano:
# nano /etc/pacman.d/mirrorlist
If you have a custom proxy server for packages, write that server at the beginning of the file. E.g.:
# first line in /etc/pacman.d/mirrorlist if you have that custom server available:
Server = http://pacmancache.private.lan:8080/$repo/os/$arch
Note: this is an optional step, only if you have a local repository configured.
Update GPG keys
Download latest packages’ GPG keys.
# pacman-key --init && pacman-key --populate archlinux && pacman-key --refresh-keys
# pacman -Sy gnupg archlinux-keyring
Install essential packages
Use the pacstrap script to install a few basic initial packages:
# Install all basic packages
# pacstrap /mnt base linux linux-firmware e2fsprogs networkmanager emacs man man-db man-pages texinfo openssh sudo
- Add the package mdadm if you are using RAID partitions
- Add other firmware packages if needed
Important note: These instructions include installation of linux and linux-firmware packages, that include non-free (non-libre) parts3.
Configure the system
fstab
The file /etc/fstab lists the system partitions. Generate it automatically for the new system:
# Generate fstab automatically
# genfstab -U /mnt >> /mnt/etc/fstab
Chroot
Chrooting means “switching the root of the filesystem to an existing folder”. It means simulating the root of the filesystem in a particular point of the actual file system, so all subsequent commands work “as if” the actual root were this new point. So, let’s simulate that the root is /mnt, i.e., the internal hard disk linux partition, just populated with packages, in order to carry on installing. We are, in a sense, simulating the same context as if we had booted to the hard disk instead of the USB drive. Therefore, from now on, and while we are inside the chroot, ‘/‘ will show the contents of the actual /mnt.
# arch-chroot /mnt
Now, the mounted future root partition (currently at /mnt) appears to the terminal as the filesystem root (/).
Time Zone
Set the time zone (substitute Region/City for your timezone-related data, i.e. Europe/Madrid ):
# ln -sf /usr/share/zoneinfo/Region/City /etc/localtime
In the example: ln -sf /usr/share/zoneinfo/Europe/Madrid /etc/localtime
Run hwclock to generate /etc/adjtime:
# hwclock --systohc
Localization
Edit /etc/locale.gen and uncomment the line: en_US.UTF-8 UTF-8, and other optional locales as you see fit for your case.
# emacs /etc/locale.gen
Then, generate locale:
# locale-gen
Create the locale.conf file, and set the LANG variable accordingly:
# emacs /etc/locale.conf
When editing it, add the line:
LANG=en_US.UTF-8
Configure the network
Create the hostname file:
# emacs /etc/hostname
Add a line with the hostname (in this example, “mysystem”):
mysystem
Activate the network service, in this case NetworkManager, to be started on every reboot:
# systemctl enable NetworkManager
Also, activate the SSH service, to be able to access the console from another computer.
# systemctl enable sshd
Create a secure SSH key and set it as authorized  optional
# ssh-keygen
Press enter at the two initial prompts. Copy the filename ending in .pub. In this case it is /root/.ssh/id_ed25519.pub. That file is the public key; it must be set up in this computer as authorized to login. That way, when you access with the corresponding private key (/root/.ssh/id_ed25519) you will be granted access.
How to access later with this key
The private key (in this case, /root/.ssh/id_ed25519) must be copied to the remote computer that wants access to this system. If you know how to copy it, you may do that now.
Generating public/private ed25519 key pair.
Enter file in which to save the key (/root/.ssh/id_ed25519): <ENTER>
Enter passphrase for "/root/.ssh/id_ed25519" (empty for no passphrase):<ENTER>
Enter same passphrase again:
Your identification has been saved in /root/.ssh/id_ed25519
Your public key has been saved in /root/.ssh/id_ed25519.pub
...
Copy the public key to authorized_keys, and set appropriate permissions
# cat ~/.ssh/id_ed25519.pub >> ~/.ssh/authorized_keys
# chmod 400 ~/.ssh/authorized_keys
Allow root to log in  temporary
Temporarily, we are accepting connections as root to this computer, authenticating with just a password (we will set the password later):
# echo "PermitRootLogin yes" > /etc/ssh/sshd_config
That line must be retired as soon as you are able to access the computer by other means (SSH keys). Do not remove the line until you check that you can access by means other than the root password.
Initialize the ramfs system
# mkinitcpio -P
Set Root Password
# passwd
Type the new password when prompted (twice), and keep it for later.
Install the CPU microcode for your architecture
Find out the processor of the computer:
# grep vendor_id /proc/cpuinfo
Look for “intel” or “AMD” in the output. Then, install the appropriate microcode:
For AMD:
# pacman -S amd-ucode
For Intel:
# pacman -S intel-ucode
Install Boot Loader
The bootloader of our choice is called GRUB. So, install the package, and also the EFI related programs:
# pacman -S efibootmgr grub
Install:
# grub-install --target=x86_64-efi --efi-directory=/boot/efi --bootloader-id=GRUB
Configure:
# grub-mkconfig -o /boot/grub/grub.cfg
Exit the chroot environment
Exit the chroot
# exit
Reboot
Unmount partitions: /mnt and all contained sub-mounts.
# umount -R /mnt
Now, either shutdown -h now, extract the USB drive when the computer stops, and boot again pressing the power button; or just type reboot and extract the USB when the screen turns black completely.
# shutdown -h now
# Then extract USB and press the power button
The computer must reboot and present a login: prompt. Type root and the password that you set before. It should log in to the console of your new system.
Extra: Add a user
After a successful first reboot, login to the system with the root user and its password.
To create a regular user, create it and give it a password:
# useradd -m <username>
# passwd <username>
Substitute <username> with the name of your user. Set a sensible password when prompted.
Extra: install a desktop environment.
In this guide we recommend a KDE/Plasma environment, with SDDM login manager.
# pacman -S plasma-meta  kde-applications-meta sddm
# systemctl enable sddm
You may reboot now. If you want to test it immediately instead, run sddm:
# systemctl start sddm
Extra: a script that runs this installation of Arch Linux
Still alpha code!  temporary optional
Instead of manually following this guide, just run this script after booting to the USB drive:
# curl -L https://git.compscit.com/pablo/archtools/raw/branch/main/install.sh | bash
The script will prompt a few data like hostname, user name, etc., and then run unattended.
I recommend to try the manual installation at least a few times, before resorting to the automated one in later system installations, in order to grasp structure and components of the system.
Beyond This Arch Linux Install Guide
You may now install more packages and populate your system with more programs. Arch Linux Wiki is a very nice source of help.
Footnotes:
1
The BIOS screen or Boot Device Selection screen depend on the computer brand and model, and can be very different from the examples presented here. You will have to guess, but it should not be very difficult. A little research could be necessary to find out what key triggers entrance in those configuration screens: checking the motherboard manual or website, or maybe just a little trial-and-error pressing keys F2, DEL, F8… until something works. Once the screen is presented, choose the USB drive and boot from it.
2
I recommend the usage of the US keyboard layout for practical reasons. More about that in another article.
3
I’m covering installation of a fully free (libre) Linux kernel and firmware addons in a future article.